
Skip the reading. Deploy this exact architecture and consolidate your B2B tech stack today.
Automated B2B Webinar Registration and Follow-Up: Building a Seamless Workflow
Webinars and live virtual events are among the most effective channels for B2B lead generation and customer education. They allow technology companies and SaaS platforms to demonstrate complex products, establish thought leadership, and engage with hundreds of prospects simultaneously. However, the administrative logistics of running a successful webinar—capturing registrations, sending calendar invites, deploying reminder sequences, and managing post-event follow-ups—can be an absolute nightmare if done manually.
In this comprehensive setup guide, we will build an elite, fully automated B2B event marketing architecture. By integrating JotForm for high-conversion registration pages, Pabbly Connect as our data synchronization hub, and AWeber for perfectly timed communication sequences, you will create a seamless attendee experience from registration to final pitch.
The Event Automation Blueprint
To maximize attendance and conversion rates, our software architecture must flawlessly execute three distinct phases: Registration, Pre-Event Nurturing, and Post-Event Follow-up. Here is how our tech stack handles it:
1. The Registration Gateway: JotForm
Standard webinar platform registration pages are notoriously rigid, ugly, and hard to track. By decoupling the registration form from the webinar software, we gain complete control over the branding, conversion rate optimization, and tracking pixels. JotForm allows us to embed beautiful, customized registration portals directly on our own domain.
[Create high-converting registration forms with JotForm..
2. The Communication Hub: AWeber
Webinar attendance rates average around 30-40%. To push that number higher, you need a meticulous reminder sequence. AWeber allows us to schedule precise, time-based automation campaigns that deliver calendar links, 24-hour reminders, and 1-hour “we are starting” alerts, ensuring your registrants actually show up.
[Build your webinar reminder campaigns with AWeber.
3. The Synchronization Engine: Pabbly Connect
When a user registers on your site, that data needs to instantly flow into your email platform, your webinar software (like Zoom or GoToWebinar), and your CRM. Pabbly Connect makes this multi-step synchronization effortless, running reliably in the background without any coding required.
[Automate your event workflows with Pabbly Connect.
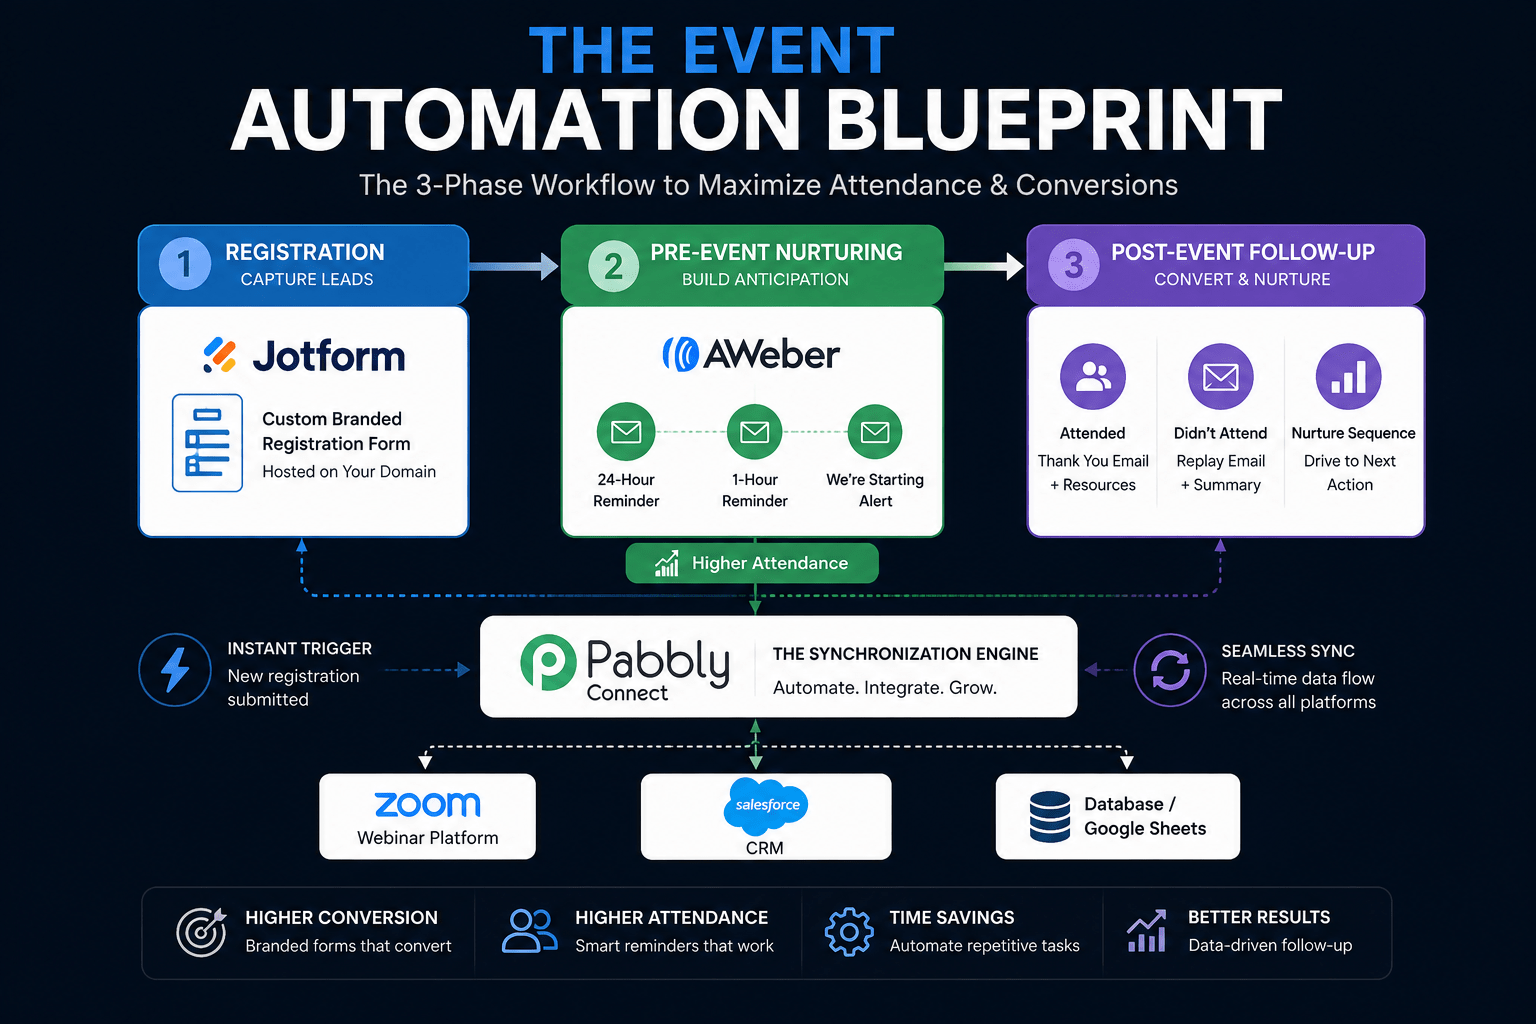
Phase 1: Designing the Registration Experience (JotForm)
The registration form must balance the need for data collection against the friction that lowers conversion rates.
Step 1: Form Creation and Branding
1. Log into [JotForm]and create a new form. Use the classic layout to allow for a header image featuring your webinar speakers.
2. Add fields for First Name, Last Name, Business Email, and Job Title. In B2B SaaS, knowing the Job Title allows you to segment your post-webinar follow-ups (e.g., technical pitch to CTOs, ROI pitch to CEOs).
Step 2: Adding Scarcity and Scheduling
If your webinar has limited capacity, you can use JotForm’s specialized widgets to cap submissions.
1. Add the “Inventory” or “Ticket Purchases” widget to show how many “seats” remain.
2. Ensure you have clear copy detailing the Date, Time (with timezone), and what the attendee will learn.
3. Publish the form and embed it seamlessly onto a dedicated landing page on your company website using JotForm’s native embed codes.
Phase 2: Architecting the Reminder and Follow-up Sequences (AWeber)
Communication is the crux of webinar success. We will build a campaign in AWeber specifically designed to maximize live attendance.
Step 1: Creating the Webinar Segment
1. In [AWeber], create a new list titled “Webinar Registrants – [Event Name]”.
2. Create custom fields for “Job_Title” and “Webinar_Join_Link” (this is crucial for personalization later).
Step 2: The Pre-Event Reminder Campaign
1. Go to Automations > Campaigns and build a new campaign triggered on “On Subscribe”.
2. Email 1 (Immediate): The Confirmation. Send a congratulatory email confirming their spot. Include an “Add to Calendar” link (.ics file or Google Calendar link).
3. Wait Action: Set this to wait until specific date/time (e.g., 24 hours before the event).
4. Email 2 (24 Hours Prior): The Primer. Remind them of the value they will get. Suggest a workbook or pre-reading material to build anticipation.
5. Wait Action: Set this to wait until 1 hour before the event.
6. Email 3 (1 Hour Prior): Urgent Reminder. Simple, plain text. “Subject: We are starting in 60 minutes. Here is your link.”
Step 3: The Post-Event Follow-up Campaign
Create a secondary campaign triggered by a Tag (e.g., “Attended_Webinar” or “Missed_Webinar”).
– For attendees: Send the replay link, a summary of key points, and the direct call-to-action (booking a demo or purchasing the software).
– For absentees: Send a “Sorry we missed you” email with a limited-time replay link to recapture their interest.
Phase 3: Synchronizing the Data (Pabbly Connect)
We now need to connect JotForm to AWeber (and ideally, to your webinar broadcasting software, such as Zoom) using Pabbly Connect.
Step 1: Trigger Setup
1. Log into [Pabbly Connect] and create a new workflow: “Webinar Registration Flow”.
2. Set the trigger to “JotForm” > “New Response”.
3. Copy the Webhook URL and paste it into your JotForm settings under Integrations > Webhooks.
4. Submit a test registration to capture the webhook data in Pabbly.
Step 2: Multi-Step Action Setup
Because webinars are complex, we will utilize Pabbly Connect’s multi-step capabilities.
1. Action 1 (Optional but recommended): Zoom/Webinar Platform. Add an action step to register the user in Zoom. Map the JotForm name and email to the Zoom registration fields. Zoom will output a unique “Join URL” for that specific attendee.
2. Action 2: AWeber. Add another action step. Select “AWeber” > “Add or Update Subscriber”.
3. Connect your AWeber account and select your webinar list.
4. Map the JotForm Name, Email, and Job Title.
5. Crucial Step: If you used Action 1 to generate a unique Zoom Join URL, map that Zoom output directly into the “Webinar_Join_Link” custom field you created in AWeber. This allows AWeber to email each attendee their own unique access link automatically!
6. Save and test the entire workflow.
Optimization and Scale
Your core webinar machine built on [JotForm], [Pabbly Connect], and [AWeber] is now operational. Here is how to scale it for maximum B2B impact.
Evergreen Webinar Automation
Once you have run a successful live webinar, you can convert this exact architecture into an evergreen, automated webinar funnel. Simply change the JotForm to ask for a preferred viewing time. Use Pabbly Connect’s internal “Delay” and “Date/Time Formatter” modules to calculate when to send the AWeber follow-ups based on the user’s selected viewing time, rather than a fixed calendar date.
Granular Segmentation
During your webinar, use polling to gather data. After the event, you can manually upload a CSV of polling data or use an API integration to append tags in AWeber based on their poll answers. If a SaaS prospect answered “Pricing is our biggest hurdle,” route them to an automated AWeber sequence specifically addressing ROI and flexible payment structures.
Conclusion
Event marketing does not have to involve chaotic spreadsheets, missed reminder emails, and lost leads. By strategically connecting best-in-class software, you build a resilient, automated machine. JotForm handles the heavy lifting of user experience and data capture. Pabbly Connect acts as the invisible IT department, seamlessly passing data between platforms. AWeber executes the communication strategy with precision timing. Implement this architecture today, and transform your B2B webinars into a highly predictable revenue generation engine.
Frequently Asked Questions (FAQ) About Event Marketing Automation
How do I handle people who register at the last minute?
When a user registers 15 minutes before the webinar begins, you don’t want them receiving the “24-hour reminder” email. [AWeber] handles this elegantly through its campaign logic. If you set your campaign wait times based on a specific date and time, and a user enters the campaign *after* that time has passed, AWeber will simply skip that specific email and move them to the next valid step. This ensures that last-minute registrants only get the immediate welcome email and the immediate “Join Now” link, providing a perfect user experience without any manual intervention.
Can I track where my webinar registrations are coming from?
Yes, and tracking attribution is critical for B2B marketing. Because you are using [JotForm] embedded on your own website, you can utilize hidden fields. You can pass UTM parameters (like UTM_Source=LinkedIn or UTM_Campaign=Q3_Newsletter) through your website URL directly into hidden fields in your JotForm. When the form is submitted, [Pabbly Connect] will capture those UTM parameters. You can then map those parameters into custom fields in [AWeber] or pass them directly into your CRM. This allows you to run reports on exactly which advertising channels are driving the highest quality webinar registrants.
Why use Pabbly Connect instead of native integrations?
While JotForm and AWeber may have basic native integrations, event marketing requires multi-platform synchronization. When a user registers, you need to add them to your email list, register them in your webinar broadcasting software (like Zoom, Demio, or WebinarJam), update your CRM (like Salesforce or HubSpot), and potentially send a Slack notification to your sales team if the registrant matches an ideal customer profile. [Pabbly Connect] is essential because it allows you to chain all of these distinct actions together from a single trigger event. Furthermore, Pabbly Connect’s one-time payment options offer significantly better long-term ROI for B2B tech companies compared to subscription-based automation tools.
What is the best way to handle webinar replays securely?
For B2B content, you often want to gate your replays to ensure competitors aren’t freely browsing your proprietary data. Instead of posting the replay on a public YouTube link, host the video on a professional platform like Vimeo and embed it on a hidden page on your website. Use [AWeber] to send the private link only to the segmented list of registrants. You can even create a secondary [JotForm] for “On-Demand Access” that captures new leads post-event, running them through a slightly modified [Pabbly Connect] workflow that instantly delivers the replay page link.