

Skip the reading. Deploy this exact architecture and consolidate your B2B tech stack today.
The Complete B2B Lead Generation Architecture: Integrating Forms, Automation, and Email
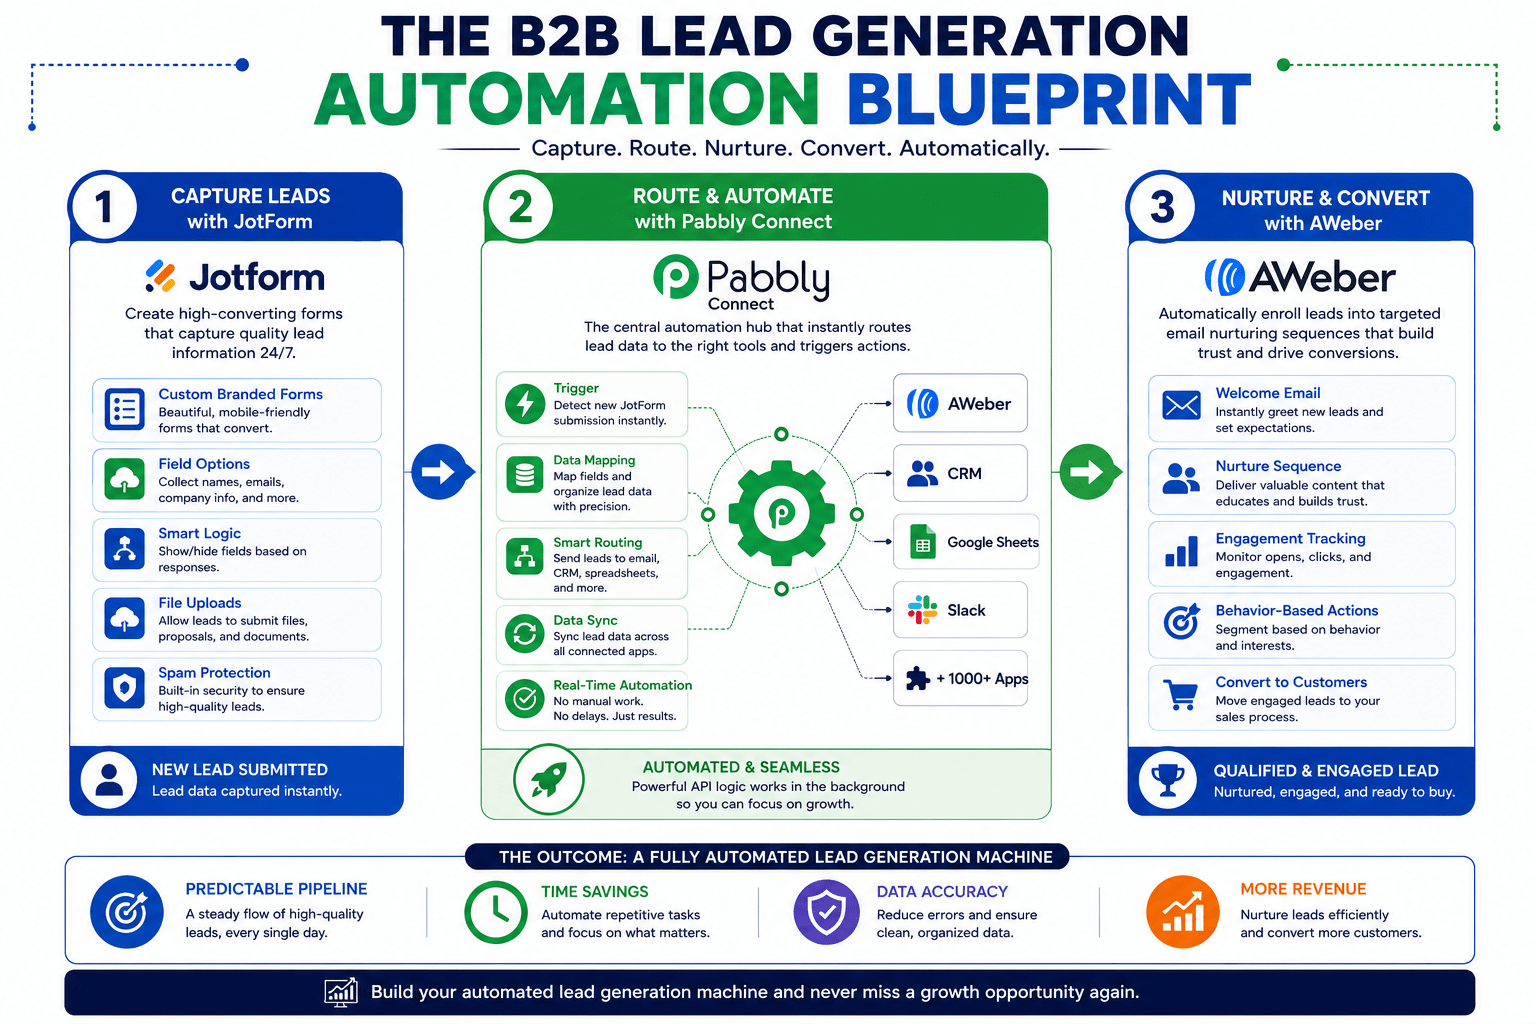
As a B2B business owner, the lifeblood of your growth relies entirely on the predictability and quality of your lead generation pipeline. The modern B2B buyer conducts extensive research before ever speaking to a sales representative. If your digital infrastructure is not prepared to capture, route, and nurture these prospects automatically, you are leaving substantial revenue on the table. In this comprehensive, step-by-step setup guide, we will walk you through building a flawless software architecture for lead generation using three foundational tools: JotForm, Pabbly Connect, and AWeber.
By the end of this blueprint, you will have a fully functional, automated machine that captures data seamlessly, routes it through powerful API logic, and initiates a targeted email nurturing sequence without requiring manual intervention.
Why This Specific Tech Stack for B2B?
The software architecture you choose dictates your operational efficiency. While there are countless all-in-one platforms available, building a modular stack using best-in-class tools ensures you have flexibility, scalability, and control over your data.
1. JotForm: The Data Capture Engine
To capture high-quality B2B leads, you need more than a basic contact form. You need conditional logic, file uploads, multi-step capabilities, and robust security (including HIPAA compliance if applicable). JotForm is the industry standard for creating professional, high-converting forms.
[Start building your forms with JotForm.
2. AWeber: The Nurturing Machine
Capturing the lead is only the first step. B2B sales cycles are notoriously long, often taking weeks or months. AWeber provides a highly deliverable, easy-to-use email marketing platform that allows you to set up automated drip campaigns to keep your brand top-of-mind.
[Create your AWeber account to automate your follow-ups].
3. Pabbly Connect: The Automation Bridge
To eliminate manual data entry, you need a reliable integration tool. Pabbly Connect acts as the central nervous system of your tech stack, instantly transferring data from JotForm into AWeber the second a form is submitted. Unlike other automation tools that charge per task, Pabbly Connect offers lifetime value and unrestricted internal steps.
[Get lifetime access to Pabbly Connect].
Phase 1: Building the Lead Capture Mechanism in JotForm
Before automating anything, you must establish the entry point for your leads. We will create a multi-step B2B lead generation form designed to qualify prospects while maintaining high conversion rates.
Step 1: Account Setup and Template Selection
1. Navigate to JotForm and create your account.
2. Click on “Create Form” in your dashboard. You will be presented with options to start from scratch, use a template, or import a form. Select “Use a Template.”
3. Search for “B2B Lead Generation.” While templates are helpful, we highly recommend customizing the fields to match your specific qualification criteria (e.g., Company Size, Monthly Budget, Industry).
Step 2: Designing for Conversion
B2B forms perform best when split into multiple steps. Use JotForm’s “Card Form” layout to present one question at a time. This reduces cognitive load and prevents prospect abandonment.
– **Card 1:** Name and Business Email.
– **Card 2:** Company Name and Website URL.
– **Card 3:** What is your primary business challenge right now? (Dropdown).
– **Card 4:** Budget timeframe (Radio buttons).
Step 3: Implementing Conditional Logic
Go to Settings > Conditions in the JotForm builder. Create a rule that says: IF “Budget timeframe” is “Immediately”, THEN show a hidden field to schedule a calendar appointment directly. This ensures hot leads are fast-tracked while others are sent to the standard email nurturing sequence.
Step 4: Testing the Form
Preview the form and submit test data. Verify that the “Thank You” page renders correctly and that the notification email is sent to your inbox. Once verified, publish the form and copy the public URL.
—
Phase 2: Setting Up the Nurturing Sequence in AWeber
With your form ready to capture data, the next step is building the destination where these leads will reside and the automated emails they will receive.
Step 1: Creating Your B2B List
1. Log into your AWeber account.
2. From the dashboard, navigate to “Lists” and click “Create New List.”
3. Name your list specifically for this campaign (e.g., “Q3 Inbound B2B Leads”).
4. Customize your confirmation message. For B2B, a double opt-in ensures high deliverability, but you can choose to disable it in list settings if you prefer single opt-in for higher volume.
Step 2: Creating Custom Fields
By default, AWeber stores Name and Email. Because your JotForm collects B2B-specific data (Company Name, Challenge, Budget), you need to create custom fields in AWeber to store this information.
1. Go to List Options > Custom Fields.
2. Add text fields for “Company_Name”, “Business_Challenge”, and “Timeline”.
3. Save your changes. These fields will allow you to personalize your email sequences (e.g., “Hi [Name], I see [Company_Name] is looking to solve [Business_Challenge]…”).
Step 3: Building the Automated Campaign
1. Navigate to Automations > Campaigns.
2. Click “Create Campaign” and select a “Welcome Series” template, or build from scratch.
3. Set the trigger to “On Subscribe.”
4. **Email 1 (Immediate):** The Welcome and Value Delivery. If they downloaded a whitepaper or requested a consultation, deliver the asset or confirmation here.
5. **Wait Action:** Add a wait block for 2 days.
6. **Email 2 (Day 2):** Case Study or Social Proof. Show how you solved a similar problem for another B2B client.
7. **Wait Action:** Add a wait block for 3 days.
8. **Email 3 (Day 5):** The Soft Pitch/Call to Action. Invite them to a discovery call or webinar.
Activate the campaign so it is ready to receive leads.
—
Phase 3: Bridging the Gap with Pabbly Connect
Now we integrate the systems. Without this step, you would be manually downloading CSV files from JotForm and uploading them to AWeber daily.
Step 1: Creating a New Workflow
1. Log into your Pabbly Connect dashboard.
2. Click the “Create Workflow” button in the top right corner.
3. Name your workflow: “JotForm to AWeber – B2B Lead Gen.”
Step 2: Configuring the Trigger (JotForm)
1. In the first window, select “JotForm” as the Trigger Application.
2. Select “New Response” as the Trigger Event.
3. Pabbly Connect will generate a Webhook URL. Copy this URL.
4. Go back to your JotForm account. Open your form, go to Settings > Integrations, search for “Webhooks”, and paste the Pabbly URL into the field. Click Complete Integration.
5. In Pabbly Connect, click “Capture Webhook Response.”
6. Go to your live JotForm and submit a test entry with dummy data.
7. Return to Pabbly; you will see the data populate instantly in the response window. Your trigger is successfully connected!
Step 3: Configuring the Action (AWeber)
1. In the next step in Pabbly Connect, choose “AWeber” as the Action Application.
2. Select “Add or Update Subscriber” as the Action Event. Click Connect.
3. Authorize Pabbly to access your AWeber account.
4. Select the Account ID and the specific List you created in Phase 2 (“Q3 Inbound B2B Leads”).
Step 4: Mapping the Data Fields
This is the most critical step of the architecture. You must map the data captured by JotForm to the correct fields in AWeber.
– Click into the “Email” field in Pabbly. A dropdown showing your JotForm test data will appear. Select the email address field from JotForm.
– Repeat this for the “Name” field.
– Scroll down to your Custom Fields (Company_Name, Business_Challenge). Map the corresponding JotForm answers to these fields.
– Set “Update Existing” to Yes, so if a lead submits a form twice, their record updates instead of duplicating.
Step 5: Testing and Activating
1. Click “Save & Send Test Request” at the bottom of the Pabbly Connect window.
2. Go to your AWeber account, navigate to Subscribers, and verify that your test lead has been added with all custom fields intact.
3. If successful, turn on the workflow toggle in Pabbly Connect. Your automated system is now live.
Advanced Strategies & Optimization
With your core architecture running via JotForm, Pabbly Connect, and AWeber, you can begin optimizing the system for greater performance.
Lead Scoring Automation
As your database grows, you will need to differentiate hot leads from cold ones. AWeber allows you to tag subscribers based on email opens and link clicks. You can set up automation rules in AWeber: if a lead clicks the link in Email 3, add the tag “Hot Lead.” You can then create a secondary Pabbly Connect workflow that triggers when the “Hot Lead” tag is added, sending a Slack notification or SMS to your sales team to call the prospect immediately.
Dynamic Content Personalization
Because we mapped custom fields from JotForm, you can utilize AWeber’s dynamic content features. Instead of generic emails, tailor the opening sentence based on the “Business Challenge” they selected in the form. If they selected “High Churn Rate,” Email 2 can specifically address churn mitigation strategies. This level of personalization significantly increases reply rates in B2B marketing.
Regular Auditing and Maintenance
An automated system still requires supervision. Schedule a monthly audit of your tech stack.
1. Check JotForm analytics to ensure the conversion rate of your form remains high. If it dips below 2%, consider shortening the form.
2. Review Pabbly Connect task history to ensure there are no failed webhook executions.
3. Analyze AWeber campaign reports. If Email 2 has a low open rate, A/B test a new subject line.
Conclusion
Building a robust B2B lead generation architecture does not require hiring an expensive developer or subscribing to bloated enterprise software. By intelligently combining the specialized capabilities of JotForm for data capture, Pabbly Connect for seamless automation, and AWeber for sophisticated email nurturing, you create a scalable, highly efficient system. This blueprint ensures that no lead falls through the cracks, allowing you to focus your time on closing deals and growing your business.
Frequently Asked Questions (FAQ) About This B2B Tech Stack
Why shouldn’t I just use a single platform for everything?
All-in-one platforms often suffer from the “jack of all trades, master of none” syndrome. While they offer convenience, they usually lack the deep customization required for complex B2B workflows. By utilizing JotForm specifically for its world-class form building, AWeber for its dedicated email deliverability, and Pabbly Connect as the specialized data bridge, you get the absolute best features of each category. Furthermore, decoupling your systems means that if you outgrow one tool, you can swap it out without tearing down your entire infrastructure.
Is Pabbly Connect difficult to learn if I don’t know how to code?
Not at all. Pabbly Connect is built specifically for non-technical founders and marketers. The interface is entirely visual—a drag-and-drop system where you simply map data from one dropdown menu to another. There is absolutely no coding, API scripting, or database management required on your end. The webhook setup process we described above handles all the complex data routing invisibly in the background.
How does this setup handle data privacy and GDPR compliance?
When dealing with B2B data, compliance is mandatory. Fortunately, all three platforms are highly secure. JotForm offers GDPR compliance features, data encryption, and even HIPAA compliance for medical B2B sectors. AWeber maintains strict anti-spam policies and provides built-in tools for subscriber consent, data export, and right-to-be-forgotten requests. Pabbly Connect processes data securely in transit and does not store your lead data indefinitely. Always ensure you have a clear privacy policy linked on your JotForm and that your AWeber lists are configured to respect regional consent laws.
Can I integrate this stack with my CRM later?
Yes, absolutely. Because Pabbly Connect supports thousands of applications, expanding this architecture is incredibly simple. Once you have the JotForm -> Pabbly -> AWeber flow working, you can easily add a subsequent step in your Pabbly workflow. For instance, after adding the subscriber to AWeber, the next action step in Pabbly could be “Create Contact in Salesforce” or “Add Deal to HubSpot.” This modular approach makes scaling your B2B operations completely frictionless.
What happens if a lead submits the form with a free email address (like Gmail or Yahoo) instead of a business domain?
In B2B lead generation, free email addresses are often a sign of low-quality or unqualified leads. You can handle this directly inside JotForm. By utilizing JotForm’s conditional logic or specialized widgets, you can restrict submissions to business domains only. Alternatively, you can use a routing step inside Pabbly Connect. You can set a “Filter” in Pabbly that checks if the email contains “@gmail.com” or “@yahoo.com”. If it does, Pabbly can route them to a generic, low-priority AWeber list, while preserving your primary B2B list for high-value prospects with corporate domains. This ensures your sales team only spends time on viable targets.